If you've used a computer, you're probably on intimate terms with the
pulldown menu. Take a look at Flash, for instance. Just go to
the top menu and click down on Edit, Insert, or Modify - and a list of more specific options is revealed. You'll find a similar setup in almost any
popular application. And now you're going to create a pulldown menu of your
very own.
Start by opening the Flash movie from the previous lessons (if it's not
open already). With nothing selected, create a new symbol. Name it Menu
and assign it the Movie Clip behavior. This symbol will hold the basic
structure of the pulldown menu, which basically consists of just two states
(keyframes): menu hidden and menu visible.
There should be only one layer in this symbol right now. Go ahead and
rename it Button. Draw and fill a basic shape (any shape you like) of the
initial button. When you are satisfied with it, select it all and define it
as its own graphic symbol called Menu Button. (You can edit Menu Button at
any point, so feel free to come back later and add a layer of text and
other embellishments to it to give this button an identity.)
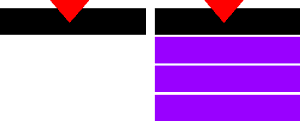
The two states of the pulldown button: On the left is the initial
button alone. On the right, the pulldown buttons are revealed.
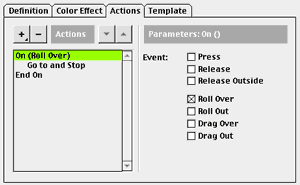
Under the Definition tab in the Instance Properties window, redefine
the Menu Button symbol for Button behavior. This will allow you to assign
actions to it later on.
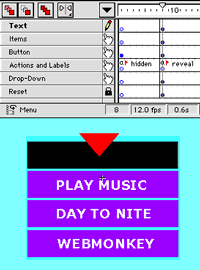
Create a new layer called Actions and Labels. This layer will have no
content, but it will contain actions and labels that affect all the other
layers, which will make editing the symbol clearer and more
straightforward. Add a Stop action to the first frame and label it
"hidden." Add a second keyframe to both layers. Assign the label "reveal"
to the second keyframe of the Actions and Labels layer. If you need more
work room in the time line, you can space out the two keyframes by simply
inserting several frames after each keyframe.
With the first frame active, double-click on the Menu Button symbol to
open its Instance Properties. Under the Actions tab, click on the "+"
symbol and select On MouseEvent. Under Parameters, check Roll Over and
nothing else. Click on the "+" symbol again and add a Go To action. With
the Go To action selected, click on the Label radio button and "reveal"
(the second keyframe you just labeled) should be available. Go ahead and
select it, then click OK to complete the first part of the menu action.
Now, take a well-deserved break from this symbol.
Return to the Edit Movie mode and add a new layer
called Pulldown menu. Then place the Menu symbol into that layer. This will allow you to preview your work as you continue. Whenever you want to check your progress from this point on, select Control:Test Movie.
Now for the pulldown part of the button. Return to editing the Menu
symbol. Add a new layer and name it Items. Insert a second keyframe in
line with the other second keyframes. In the second keyframe, draw a buttonlike shape for the first menu item. Convert it into a button symbol called Menu Item. Edit Menu Item by adding
keyframes for the Over and Hit states. Change the color of the rectangle
for each state. When you're finished, return to editing the Menu symbol.
Be sure the second keyframe and the Items layer are active. Under the
Instance Properties for the Menu Item symbol, select "Track as menu item"
in the Definition box. Click OK, and duplicate this symbol (Command-D for Mac, Control-D for Windows) to create
three or more menu items and arrange them in a nice order. See how useful
nested symbols are?
Now let's assign a different action to each button.